When one wishes to test a load and execute mechanism with the Beaglebone Black Programable Real Time Unit (PRU) typically a simple program implementing some sort of visible action (such as toggling an output) is used. In the microcontroller world the simple "Blinking LED" is pretty much the equivalent of the "Hello World" program.
The USR3 LED is a good choice for such a demonstration item as it is already present on the Beaglebone Black board, it is quite visible, and is usually unused by anything else. Furthermore, in order to toggle an external pin high or low, the associated GPIO must be enabled in the PinMux. It so happens that, by default on most Beaglebone Black systems, the USR3 LED is tied to a GPIO that is usually always enabled in the PinMux. This means that you probably do not have to worry about Device Tree Overlays in order to configure the appropriate GPIO so the PRU can turn the USR3 LED on and off.
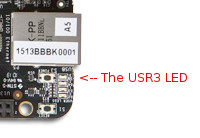
The example below discusses how to use the BBBCSIO libraries PRU_Driver class to load a PRU binary (compiled PASM Assembler). The example binary being loaded will blink the USR3 LED once per second for ten seconds. If you are new to the Beaglebone Black the image below illustrates the location of the onboard USR3 LED.
NOTE: The code the example below will run in the PRU is called PRUBlinkUSR3LED.bin and the PASM Assembly Language source for this code can be found in the file
BBBCSIOHelp_PRUBlinkUSR3LEDExamplePASMCode.html. You should probably read the comments in the PRUBlinkUSR3LED.p
source file in order to understand the operation of this program.
The example code running in the PRU uses a GPIO value of 88 which is exposed as GPIO1_24 and has a hard wired connection to the USR3 LED. In most cases this pin will be available as an output. Be aware that if you decide to use a different GPIO as an output you CAN NOT necessarily assume that that pin is available as a GPIO on your Beaglebone Black and even if it is a GPIO you still cannot assume it is set as a GPIO output (as opposed to being an input). Any one pin can be used internally for any of about half a dozen different peripherals (UART, SPI bus, PWM, A/D, HDMI, EMMC etc) and it is not a given that a randomly chosen GPIO or any specific GPIO is available.
So, before using other pins, you will need to ensure that the associated GPIO is configured as an output. There is no code you can call in the BBBCSIO library which does this. You MUST configure the GPIO externally prior to running your executable - usually this is done by editing the device tree.
The code below illustrates how to use the PRU_Driver class to launch a compiled PRU binary. Other than the launch there is no output.
        /// +=+=+=+=+=+=+=+=+=+=+=+=+=+=+=+=+=+=+=+=+=+=+=+=+=+=+=+=+=+=+=+=+=+=+=+=
        /// <summary>
        /// Configures a PRU and runs a compiled binary in it.
        /// </summary>
        /// <param name="pruID">The pruID</param>
        /// <param name="binaryToRun">The binary file to run</param>
        /// <history>
        ///    05 Jun 15  Cynic - Originally written
        /// </history>
        public void PRUBlinkUSR3LED(PRUEnum pruID, string binaryToRun)
        {
            // sanity checks
            if (pruID == PRUEnum.PRU_NONE)
            {
                throw new Exception("No such PRU: "+pruID.ToString());
            }
            if ((binaryToRun == null) || (binaryToRun.Length == 0))
            {
                throw new Exception("Null or zero length binary file name specified");
            }

            // build the driver
            PRUDriver pruDriver = new PRUDriver(pruID);
            // run the binary
            pruDriver.ExecutePRUProgram(binaryToRun);

            // close the driver, the code in the PRU remains running
            pruDriver.Dispose();
        }
The PRUBlinkUSR3LED call would be made via a line which looks like:
PRUBlinkUSR3LED(PRUEnum.PRU_0, "/home/debian/CSharpCode/PASMCode/PRUBlinkUSR3LED.bin");