
"... and no one shall work for money, and no one shall work for fame; But each for the joy of the working, and each, in his separate star, shall draw the thing as he sees it, for the god of things as they are"
-Kipling
-Kipling
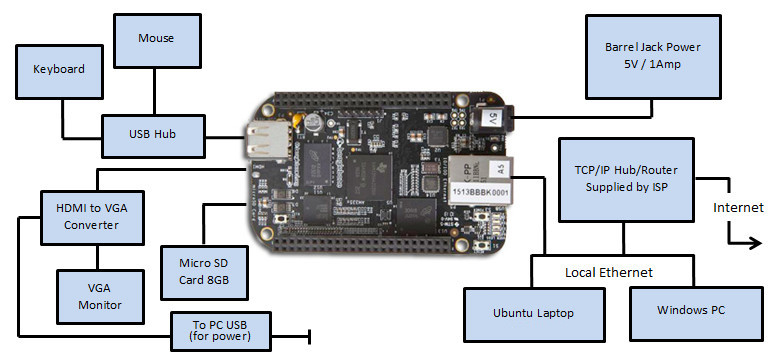
This page describes a hardware setup which can be used when developing in C# and Mono on the Beaglebone Black. The following pages in this series describe the procedure for installing the Debian armhf O/S and C# on the Beaglebone Black and the contents of this page are necessarily oriented towards that end result.
Much of the discussion on this and subsequent pages revolves around the fact that installing C# and Mono on the Beaglebone Black requires a hard float armhf Linux distribution as opposed to the default soft float armel operating system which ships with most versions of the Beaglebone Black. Although this situation may now have changed with newer versions of the BeagleboneBlack, the Linux operating system which is installed by default the Beaglebone Black board is usually unsuitable for running C# and Mono because there is insufficient free space left in the eMMC memory. This means you have to install a new operating system and you have to put that O/S on a MicroSD card rather than in the eMMC memory. Fortunately this is not very difficult. .
A Debian armhf Linux version specifically tailored for the Beaglebone Black and suitable for C# and Mono installation is available for download from http://beagleboard.org/latest-images. As of the time of this writing, the latest version available is Debian 9.5 2018-10-07 4GB SD LXQT and all discussions on this page and the subsequent series of pages will reference that operating system. You can find the installation instructions in the "Update board with latest software" section of the Beaglebone Black Get Started page.
You have a choice of connecting your Beaglebone Black to the Internet in one of two ways. You can either connect the USB cable from the Beaglebone Black to a PC (running Windows, Linux, or Mac O/S) and then convince that PC to route the Beaglebone Black's TCP/IP packets out through its Internet connection, or you can use an ethernet cable to directly plug your Beaglebone Black into your local area network (an ISP Hub for example) and let it connect to Internet with no intermediary.
In my opinion, for development work with C# and Mono, the best way is to use the Ethernet cable method and simply make the Beaglebone Black a device on your local area network. This method has the advantage that it is much simpler, faster and, on my system at least, less troublesome since Windows seemed to have trouble remembering how to route the packets every time I rebooted it. In addition, later when you adjust the Beaglebone Blacks device tree (and you probably will), you will find that the ability to log into the Beaglebone Black using only a keyboard and monitor is invaluable if you mess things up.
The following discussion and hardware setup is solely concerned with the direct Ethernet method of connecting the Beaglebone Black to the Internet. If you wish to use the USB method of connecting the Beaglebone Black to the Internet a short discussion on How to Connect the Beaglebone Black to the Internet via USB has been posted over in the Beagle Notes section.
Assuming you do wish to connect your Beaglebone Black to the Internet via ethernet, rather than through the USB cable, you will need to somehow get access to a shell prompt or other console window. You cannot just connect via ssh even though the ethernet connectivity is probably functional because until you login you will not know the IP address - by default a random IP address will be assigned to the Beaglebone Black automatically. To connect via a console you either use a serial connection (not discussed here) or you plug in a keyboard, mouse and monitor.
The Beaglebone Black contains two USB ports. One is a host port and one is a client port. The client port is used to make the Beaglebone Black look like a client device to a USB host such as a PC. This port is the one that has a mini USB connector and for which you probably received a USB cable with your purchase. You do NOT want to hook up the key board and mouse to this port. To manage a keyboard and mouse, the Beaglebone Black needs to act as a USB host - just like a PC. The USB host port is located on the opposite end from the RJ45 ethernet connector.
You can plug a mouse or keyboard directly into the Beaglebone Blacks USB Host port and it will work. However, as there is only one port, you can only hook up one at a time. You may wish to plug in a USB Hub and then connect both the keyboard and mouse into that. I used a Belkin 4-port Travel Hub (model F5U407cwBLK) I had lying around and it worked fine. I imagine pretty much any USB hub would do the job.
In order to log in and make changes you are going to need to see what is going on. To do this you need video output.
The Beaglebone Black has built-in HDMI output which is accessible via a micro HDMI connector located on the end opposite the ethernet RJ45 connector. If you have an HDMI capable monitor handy all you need is a MicroHDMI to HDMI cable and you are good to go. If, like me, you have a shortage of bench space on which to place HDMI capable monitors (they don't seem to sell small ones these days) and a massive oversupply of perfectly useable old VGA flat screen monitors, you may well wish to purchase an HDMI to VGA converter.
I hooked up an old 1024x768 VGA monitor to a Cable Matters Active Micro HDMI to VGA Male to Female Adapter (Model 113048-WHITE) and this worked perfectly. Well worth the small cost of the adapter. Note that you need to supply this Adapter with external power via a USB connection using the supplied cable. The Beaglebone Black is not really up to supplying the required power via its USB port. I plugged the USB connector cable into an old phone charger and this worked well. Plugging it into a PC USB port would also work just fine.
The Debian 9.5 2018-10-07 distribution has working ethernet connectivity straight out of the box. I just used a Cat5 ethernet cable and plugged the Beaglebone Black into the TCP/IP hub provided by my Internet Service Provider. In my case, this hub has both Internet connectivity and also the DHCP server needed to provide the Beaglebone Black with an IP address.
Note: If you do not have a DHCP server on the local area network, the Debian installation on the Beaglebone Black might take
a while (2 minutes perhaps) to boot up. This is because it is looking for an IP address from a DHCP server
as part of the boot sequence and has to wait for that request to time out before it can continue.
If you wish to disable this, once you finally get logged on, you can just edit the /etc/network/interfaces file and comment out the line in the eth0 section that
contains the word dhcp.
This isn't, strictly speaking, a part of the hardware setup. However you are going to need a MicroSD card in future steps in order to install the new Debian operating system. You might as well get one ahead of time. You should probably get one at least 16 GB in size. 8 GB will probably work but you might find yourself running out of space. Not all MicroSD cards are the same in terms of performance. You will be doing yourself a favour if you get a fast one.
Booting off a MicroSD card also has a number of advantages - the primary one being that if you make a change and the Beaglebone Black refuses to boot you can just boot off the original default installation (the default installation does not get removed when you boot from the SD card), mount the SD card into the original filesystem and fix up or undo whatever changes you might have made. The alternative, if one messes up an eMMC based installation, is to reformat the eMMC memory from scratch and go back to square one. You can also keep multiple SD cards handy if you are trying different things and there are occasions where you might wish to disable the eMMC memory in order to enable various GPIO's and other OCP devices which share the same internal resources.
In short, an SD card installation is just as fast and, due to its increased recoverability, it is a lot more usable as a development platform. Later, when you have everything sorted out the way you wish, you can just flash the eMMC memory from the contents of the SD card and carry on from there (use the instructions on this page). However, if you have installed C# and Mono, the O/S on the MicroSD Card will be too large to fit - unless you have chosen to use a Debian release which does not implement the GUI and is command line only.
As mentioned earlier, I wished to use a PC to remotely develop, compile and debug the C# code executing on the Beaglebone Black. Previously, I used an old laptop running Ubuntu Linux as the Development PC. Now that remote debugging on the Beaglebone Black is available in Visual Studio 2017, I use a Windows 10 laptop for this purpose. This proved to have more than sufficient to handle the remote debugging. The Windows 10 box is also configured to share the output directory containing the C# binaries of whatever project I am working on with the Beaglebone Black. This ensures the latest version is always available on the Beaglebone Black without any manual intervention on my part. The networked folder mechanism works very well and there is no (human noticable) delay between the end of compilation on the PC and the appearance of the compiled exe and its associated dll's on the Beaglebone Black. Of course, since the software is C#, the same binaries run under the .NET Runtime on Windows and under Mono on the Beaglebone Black.
The contents of this web page are provided "as is" without any warranty of any kind and without any claim to accuracy. Please be aware that the information provided may be out-of-date, incomplete, erroneous or simply unsuitable for your purposes. Any use you make of the information is entirely at your discretion and any consequences of that use are entirely your responsibility. All source code is provided under the terms of the MIT License.
Various internet resources were used to help understand the workings of the Beaglebone Black. Especially useful were Derek Molloys Beaglebone pages. Thank you Derek!.