
"... and no one shall work for money, and no one shall work for fame; But each for the joy of the working, and each, in his separate star, shall draw the thing as he sees it, for the god of things as they are"
-Kipling
-Kipling
This page describes how to configure the Beaglebone Black as a CIFS Client and to configure a remote Windows PC so that the contents of a folder on the remote Windows box are visible on the Beaglebone Black. This page is part of a series of web pages which describe how to install C# and Mono on the Beaglebone Black and also how to configure a useful remote compilation and debugging toolchain for it.
The previous page in this series described how to download and install Mono on the BeagleBone Black so that it can compile and run programs in C#. A subsequent page will describe how to compile C# programs on a Windows 10 box and remotely execute (and debug) them on the Beaglebone Black from within Visual Studio.
The primary purpose of mapping a directory on the Windows PC into the Beaglebone Black is to ensure that any executable code created remotely in Visual Studio is instantly and automatically available to run on the Beaglebone Black without any user interaction. In short, a pleasant working environment with remote compilation and execution is achieved by creating an executable on the Development PC using a nice IDE and having CIFS automatically move that file over to a mapped directory on the Beaglebone Black where it can be run.
The Windows 10 PC needs to be able to provide the files in a directory to the Beaglebone Black. This means the Development PC needs to be configured to offer a folder as a network share and the Beaglebone Black needs to be configured as an CIFS Client. In general I followed the instructions on these two pages, although there were some variations: https://websiteforstudents.com/mount-windows-shares-everyone-ubuntu-17-04-17-10/ and https://websiteforstudents.com/create-shares-everyone-full-access-windows-10-server/. The specific steps taken are outlined below - but first a warning.
WARNING: The steps on this page will create a folder on the Windows PC that is available for read and write by anybody on the local area network. This is a acceptable risk for my purposes since the contents of any such shared folder will all be open source eventually anyways. In addition, the mounted directory on the Beaglebone Black will be read/write by any user on that system. If this low security is not acceptable to you then you must take appropriate steps (and do the extra research) to ensure that you protect the information in the shared folder - this page may help.
When configuring the Windows 10 PC (hereinafter referred to as the "Development PC") to share a folder the first thing you need to do is to make sharing possible. This is done in the Settings area of the Windows Control Panel. To open the Settings form right click on the Windows Menu in the lower left hand corner and choose the Settings option. You should see a form like the one below open up.

Choose the Network and Internet option and you will see a form like the one below open up.
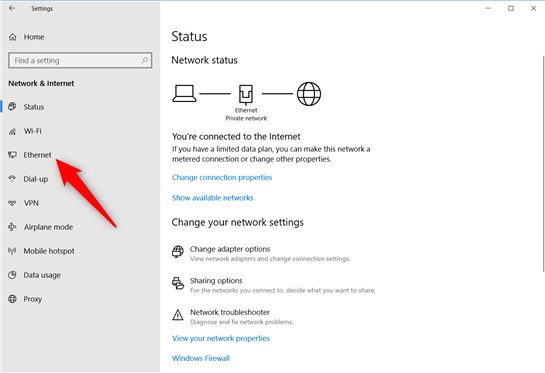
Note that there are independent settings for every device. My PC (it is a laptop) can connect to my local area network via Ethernet or via WiFi. I have left the WiFi settings alone and only enabled file sharing on the Ethernet connection. This enables me to bring my laptop to remote locations (such as a hotel) and connect to the Internet via WiFi without any concerns that I am sharing files on a public network. The discussion below only refers to the Ethernet settings - if you enable the sharing on a connection you will use in a public place (airport, hotel, library etc) you will need to remember to disable file sharing before you connect.
Selecting the Ethernet option opens up a form as shown below.
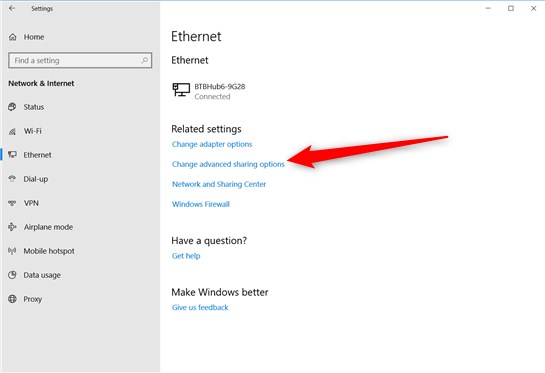
Choose the Change the Advanced Sharing Options link and a form like the one below will open up.

Enable the Turn on File and Printer Sharing option. You do not need to enable the Turn on Network Discovery option - the Beaglebone Black will know the name of the share it wishes to connect to. You may need to enable this if you use other techniques (not described on this page) such as a Samba share.
At this point your Windows 10 PC can share files and folders with other devices connected on your local area network. We now have to
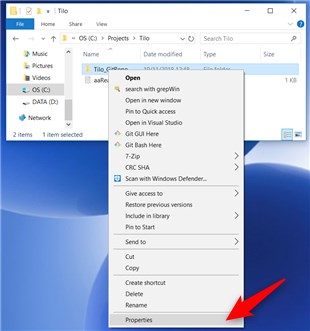
tell Windows which folder to share. In the discussion below the C:\Projects\Tilo\Tilo_GitRepo belonging to
the Tilo project will be shared with the Beaglebone Black.
First right click on the folder you wish to share and select the Properties option
When the Properties form pops up choose the Sharing tab.
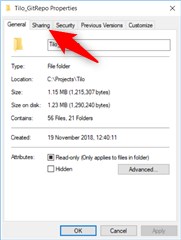
The Advanced Sharing button will contain the options you need. Press on this button...

... and a new form will pop up.
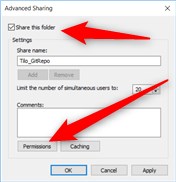
Select the Share this Folder option and then press the Permissions button. You will see a form like the one below pop-up...

Note that the group you are sharing with is "Everyone" and you can give them the permissions you wish using the checkboxes at the bottom. I provided "Everyone" with full control and read/write access.
Warning: At this point you have made the contents of the directory available to anyone on your local area network who wishes to view it. The user will have to know (or be able to guess) the name of the Network Share before they can connect to it though since you did not enable Discovery in the Settings earlier.
You will also need to know the name of the Network Share so you can configure it on the Beaglebone Black. Now that the folder is shared, the name can be found on the main properties panel as shown below.

In this example the Network Share name is \\MARINERIS\Tilo_GitRepo. In particular, note the direction of the slash "\" characters
used in the Network Share name - this will become important later on.
At this point, the Development PC is prepared to serve the contents of the C:\Projects\Tilo\Tilo_GitRepo subdirectory
to any CIFS client on the local area network. The next task is to set up an CIFS Client on the Beaglebone Black
In this example, the user on the Beaglebone Black is devuser and its home directory is /home/devuser. We will
map the exported Tilo_GitRepo directory into our local filesystem in the /home/devuser/Tilo_GitRepo directory.
Once mounted, we will have local access on the Beaglebone Black to all files in the Development PC's C:\Projects\Tilo\Tilo_GitRepo subdirectory.
This mapped file system will be fully read-write by both parties. Any changes, by either the Development PC or the Beaglebone Black, to the files in this tree
will be immediately reflected to the other party by CIFS.
Install the CIFS client (as root on the Beaglebone Black)
sudo apt-get install cifs-utils
Make a mount point for the CIFS drive offered from the Development PC and set the permissions
mkdir /home/devuser/Tilo_GitRepo
chown -R nobody:nogroup /home/devuser/Tilo_GitRepo
chmod -R 0777 /home/devuser/Tilo_GitRepo
Edit the /etc/fstab file to set up the mount of the exported CIFS drive and insert a line like the one below.
//MARINERIS/Tilo_GitRepo /home/devuser/Tilo_GitRepo cifs username=AccountNameOnPC,password=ItIsASecret,uid=nobody,iocharset=utf8,noperm 0 0
In particular, note that the Network Share Name has UNIX style forward slashes "/" even though the share name on the Windows PC uses back slashes "\". Also note that besides the local mount point, you have to supply the user name and password of the windows machine in the share. This means this information will be on view to any user on the Beaglebone Black. If this is not acceptable then you will need to use alternate methods that prompt for a password.
Everything should now be ready - but first will need to mount the shared folder. A command like the one below will do this for us.
sudo mount -a
We can test this by running a quick ls -l ~/Tilo_GitRepo command
in the devuser account to see if the Development PC's files are now
present and also by running an exe from a known project which was previously compiled over on the Development PC to see if the remotely compiled files are executable
~/Tilo_GitRepo/HelloWorldTest/HelloWorldTest/bin/Debug/HelloWorldTest.exe
You will probably find that, if you reboot the Beaglebone Black, that the filesystem is not automatically mounted when the system restarts.
This is because the
mounting operations happen before CIFS is started. We want this mapped filesystem to automatically mount up when the Beaglebone Black boots and
can easily fix this by adjusting our entry in the /etc/fstab to use the x-systemd.automount option. This option, which triggers
the shared folder to automatically mount on first use, is
shown in green in the modified mount statement below.
//MARINERIS/Tilo_GitRepo /home/devuser/Tilo_GitRepo cifs username=AccountNameOnPC,password=ItIsASecret,uid=nobody,iocharset=utf8,noperm,x-systemd.automount 0 0
If we reboot now we can test this...
sudo reboot now
At this point you should be able to create a new project (HelloWorldTest in this example) over in the shared folder on the Development PC, compile it and then
switch to the Beaglebone Black and
run that projects executable with a command like: mono ~/Tilo_GitRepo/HelloWorldTest/HelloWorldTest/bin/Debug/HelloWorldTest.exe.
The contents of this web page are provided "as is" without any warranty of any kind and without any claim to accuracy. Please be aware that the information provided may be out-of-date, incomplete, erroneous or simply unsuitable for your purposes. Any use you make of the information is entirely at your discretion and any consequences of that use are entirely your responsibility. All source code is provided under the terms of the MIT License.