
"... and no one shall work for money, and no one shall work for fame; But each for the joy of the working, and each, in his separate star, shall draw the thing as he sees it, for the god of things as they are"
-Kipling
-Kipling
This page describes how to connect your PocketBeagle to the Internet using a USB cable connected to a Windows 10 PC. Also discussed is some basic "get started" type information including how to connect to the Linux shell on the PocketBeagle via SSH. It is one of a series of (hopefully) helpful Beaglebone notes - more of which can be found on the BeagleNotes page. Although this information discusses the PocketBeagle in particular, the information on this page is applicable to connecting any of the Beaglebone boards to the Internet via a Windows 10 PC.
If you are using Windows 7 you may find the older page Networking Setup Connecting The Beaglebone Black to the Internet Via USB page to to be more useful.
If you are just getting started the first thing you will need to do is get an 8GB (or bigger) mini SD card and format it with the latest operating system version. This is a reasonably simple process and the instructions can be found at: http://beagleboard.org/getting-started. Make sure you choose the image specific to your Beaglebone - if using a PocketBeagle choose the "headless" version. This will save you memory (and other resources) as the PocketBeagle has no mechanism to attach a keyboard, mouse or monitor so there is no need to include code to support that functionality.
After flashing the latest image onto the micro SD card, place the SD card in the slot on the PocketBeagle and plug the PocketBeagle into the PC's USB slot using a micro USB cable. Note this cable does not come supplied with the PocketBeagle board so you will need to purchase one if you do not already have one.
Plugging in the USB cable will supply the PocketBeagle with power and you will immediately see the blue power LED activate and shortly thereafter the four USR LEDS will light up simultaneously for about 2 seconds. Once done, the four USR LEDs will turn off and begin to flash at occasional random moments. If you do not see all four USR LEDs light up then it means your PocketBeagle did not boot successfully. In particular, if just USR LED 0 and 1 light up (and stay lit) this means the boot process failed. This should not happen - and in my case it was a bad SD card which caused the problem.
On Windows 10 you should see the PocketBeagle appear as a drive on the PC and a Windows Explorer window will probably automatically launch to show you the files it contains. You should not need to do anything special to the Windows 10 PC to make this happen - to the PC the PocketBeagle is simply a USB drive. If you do not see the PocketBeagle as a USB drive then you should stop now and fix that problem as none of the advice below will work. You can consult the http://beagleboard.org/getting-started page for some things to try.
At this point the PocketBeagle cannot connect to the Internet (we will fix that shortly) but we should check that its internal TCP/IP configuration is operational. Use a Chrome, Firefox or Edge browser (Internet Explorer apparently does not work) and connect to the address http://192.168.7.2. You should see a nice integrated development environment (IDE) called Cloud9 start up. The successful appearance of the Cloud9 interface tests both the TCP/IP connectivity to the PocketBeagle and the functioning of its IP address (192.168.7.2). The reason you see the Cloud9 IDE in your browser is that the PocketBeagle is running a mini-webserver over the USB connection to the PC. The PocketBeagle is not connected to the Internet yet - it is still isolated on a sub network which only your Windows 10 PC knows about.
The Cloud9 IDE is really quite sophisticated and can do a number of interesting things. It is fun to work through the tutorials and try stuff out.
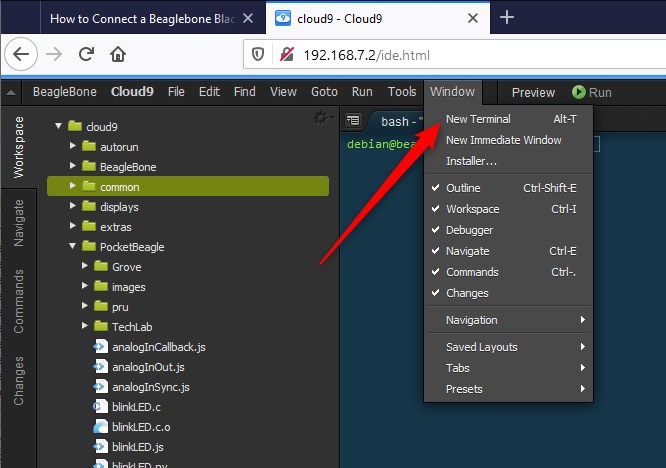
However, apropos to the task of getting the PocketBeagle on the Internet, one thing we want to do next is start up a terminal session. This can be done
by pressiing Alt-T in the IDE or by selecting the Window->New Terminal menu item as shown above. Once that is done you will see a terminal session
start and you will be presented with a command prompt. You should not need a username or password, but if you do, the default is debian/temppwd.
Small Digression: Connecting using an SSH Telnet Client
Now that the PocketBeagle is operational, you may find the Terminal in the Cloud9 IDE to be a bit clunky and would like to use a standalone connection mechanism so that you do not need to start a browser in order to interact with the PocketBeagle. This step is not strictly necessary - all of the actions below can be performed perfectly well in the Cloud9 terminal environment. However, for completeness, we might as well discuss how to use a standard remote SSH terminal program.
Telnet is basically a method of presenting a shell prompt from a remote device in a window on a local computer (in this case a Windows PC). Telnet itself is not used much anymore as it is pretty insecure and is disabled by default on nearly all new Linux installations. A similar mechanism called SSH (Secure SHell) is used in its place.
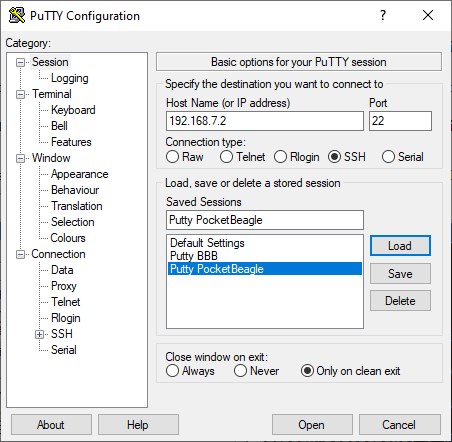
In order to use SSH on Windows you have to have an application that provides it. There are many such software programs – the most common of which is PuTTY. PuTTY is free and can be found on the website below
http://www.chiark.greenend.org.uk/~sgtatham/putty/
I'll not tell you how to install and configure PuTTY here – you can easily find out a lot of information on how to do that on the Internet. Once you get
PuTTY installed and started you can connect to the IP address of the PocketBeagle (192.168.7.2) using the main configuration panel (left image below).
Once connected, you should see a window like the one on the right side below
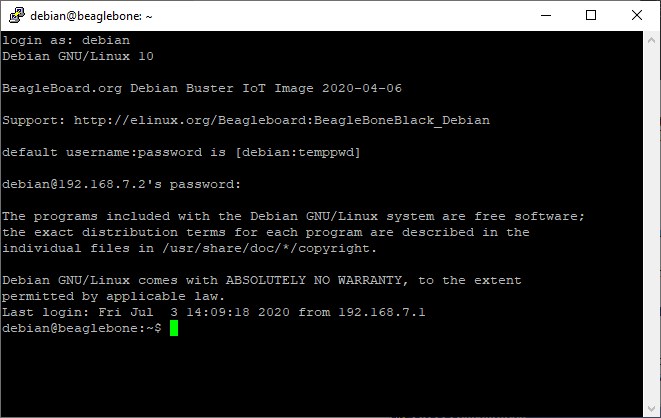
Don't be alarmed if the information you see on the screen is slightly different than that shown above. Each variant and distribution of Linux will probably look a bit different. They all operate mostly the same though – at least when you are at the novice level.
When you first connect to the PocketBeagle the only available username will probably be debian (with a password of temppwd)
Lots of times the default login information is given to you on the
page from which you downloaded the source image. In the above example, it also helpfully tells you the default username and password in the login banner right on
the screen. You should always change the password by using the passwd command (just type passwd at the prompt). You should also change
the root password from its defaults with a command like sudo passwd root.
Since we connected ok we have a pretty good idea that is all is well with the IP configuration on the PocketBeagle. For completeness, lets check the basic functionality of the TCP/IP stack again with a few ping commands.
The first thing you need to know is the IP address of the PocketBeagle. This is always 192.168.7.2. It is the value you put into the
browser or PuTTY in order to connect to it.
At the PocketBeagle shell prompt (PuTTY window or Terminal) type the command
ping 192.168.7.2
you will see the response below (hit Ctrl-C to stop it)
64 bytes from 192.168.7.2: icmp_req=1 ttl=64 time=0.385 ms

64 bytes from 192.168.7.2: icmp_req=2 ttl=64 time=0.201 ms

64 bytes from 192.168.7.2: icmp_req=3 ttl=64 time=0.211 ms
The ping command is bouncing a test packet off the PocketBeagle's own TCP/IP port to see if it can find it. If you do not know what the ping command does
you should probably look it up now as it is fundamental to the debugging of any TCP/IP connection. The corresponding port on the other side of the USB connection has the
address 192.168.7.1 but a command like
ping 192.168.7.1
may or may not return any results. It should, but the Windows firewall sometimes keeps the PC from responding to pings – even ones connected via a local USB. Give it a try - but do not be alarmed if you do not see anything.
If your PocketBeagle is connected to the Internet you should be able to issue a command like
ping 8.8.8.8
and see a response. The IP address 8.8.8.8 is the google.com main nameserver site and it is always online and it will return pings. If your PocketBeagle is
connected to the Internet (at this point it probably it is not) you should get a response from it - most likely though you will just get a network unavailable error or timeout.
OK, now we are ready to begin the process of getting the PocketBeagle on the Internet.
The first thing we need to do is tell the PocketBeagle how to contact the wide world. We can do this temporarily (unless you take steps otherwise, you will need to do this each time you reboot the
PocketBeagle) by issuing a route command (as root). If you are not connected as root you can preface every command with a sudo or use the sudo -s
command once to change into root and save yourself the bother of typing sudo each time. I'll show the usage of the sudo command on the line below but thereafter will not
use it - you can assume a sudo -s command has been previously entered.
sudo /sbin/route add default gw 192.168.7.1
This updates the PocketBeagle's IP routing table with a default route which tells the PocketBeagle that any attempt to communicate with an IP address that
it does not know about (i.e. 8.8.8.8) should be forwarded on to the default gateway 192.168.7.1 to handle. This, in a nutshell, is more or less how every
packet on the Internet finds its way to where it needs to go - either the device handling the IP packet knows exactly where to send it or it sends it down a default route to a device that
(hopefully) does know what to do with it.
You have now told the PocketBeagle what to do with connections to IP addresses it does not know how to handle but you still have to tell the Windows how to route traffic from the Internet to the PocketBeagle. This is necessary because Windows just doesn't assume that the TCP/IP Packets arriving via the USB port and which are not specifically for it are automatically destined for the Internet (and vice versa). In other words, packets arriving on the Windows box via the USB connection on the PC have no default route.
The network configuration is done via the Network Configuration settings in the Windows Control Panel – the examples below are from Windows 10. If you are using Windows 7 you may find the older page Networking Setup Connecting The Beaglebone Black to the Internet Via USB page to to be more useful. Open the Control panel and navigate to the Network Connections panel – it is about three layers deep. You will see something that looks like...
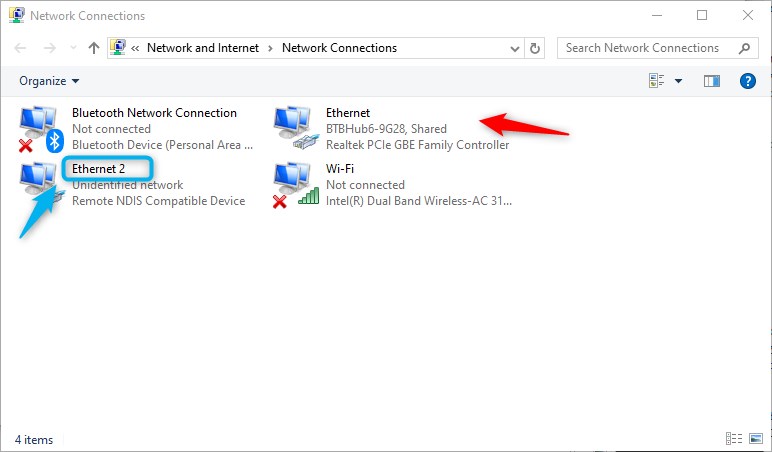
Note there are four connections the panel in this example. Your PC may have more or fewer but there should be at least two if the PocketBeagle is connected via USB. In this example the two we are interested in are the ones labeled “Remote NDIS Compatible Device” and the other one which (on the example PC) is labeled BTHub3-9G28. Either or both of these will likely have different names on your system. Also, in particular, note down the name "Ethernet 2" on the Linux USB NDIS connection (circled above in blue) as we will need it shortly.
The BTHub3-9G28 connection is the one which connects the PC to the Internet and the Linux USB Ethernet/NDIS Gadget connection is the one that connects the PC to the
PocketBeagle. We have to tell the PC that any information to and from IP address 192.168.7.2 (the PocketBeagle) should be routed from one connection to the other.
In the Windows environment this is called connection sharing.
Right click on the PC's Internet connection icon (BTHub3-9G28 in this case) with the mouse and choose the Properties option from the context menu that pops up. A window like the one below will appear - this is how you set all of the properties for that connection.
Important Note: Just to be perfectly clear, we are EDITING the existing, working Internet connection and we are going to give it the NAME of the Linux USB NDIS connection - don't get this backwards or nothing will work. In other words, in this example, we right click on the Ethernet connection and we supply it details from the Ethernet 2 connection.
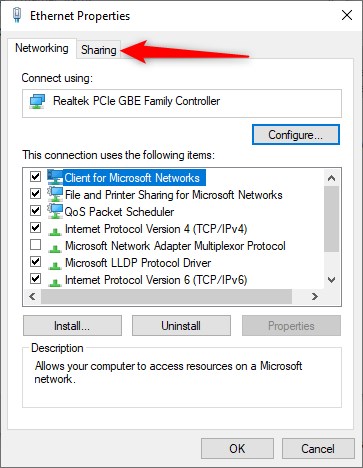
We need to share this connection with the PocketBeagle (the Linux USB Ethernet/NDIS Gadget connection). Click on the Sharing tab at the top and you will see the sharing options appear as shown below...
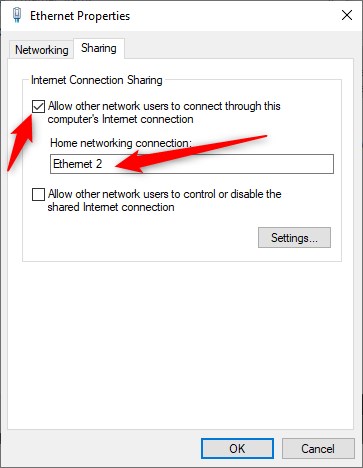
The Sharing tab offers a drop down text box which can be used to select the name of the connection you wish to share with. You need to use the name of the connection rather than the name of the device it connects to. Recall that we previously noted that the Linux USB Ethernet/NDIS Gadget connection was labeled Ethernet 2. This is the name we wish to type in here. Be sure to enable the "Allow other network users to connect through this computers Internet connection" option as shown above. Once that is done, press OK and close the connection configuration form.
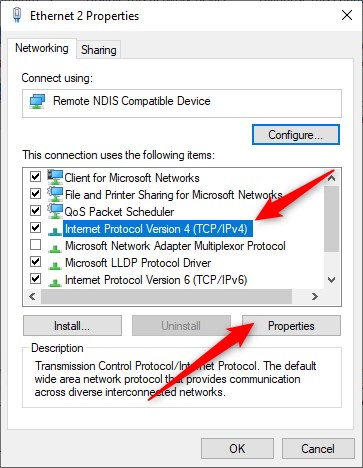
On most Windows systems the configuration of the sharing option above stops and restarts the PocketBeagle Internet connection. Unfortunately, when it automatically restarts, Windows guesses the setup wrongly and we have to now make a slight configuration change to the PocketBeagles connection as well. As you did above with the PC's main Internet connection, right click with the mouse on the Linux USB Ethernet/NDIS Gadget connection, choose the Properties option, and bring up the configuration form for that connection. Click with the mouse on the Internet Protocol Version 4 (TCP/IPv4) option - it will highlight in blue as shown below. Once that option has been selected, click on the Properties button located on the lower right hand side of the panel.
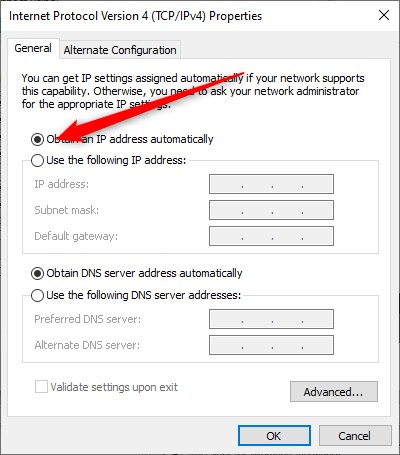
A window similar to the one below will pop up. It is the IP address which is now incorrect (it might be something like 192.168.137.1).
You can either enter the correct IP address which will
be 192.168.7.1 (note: not 192.168.7.2 which is the PocketBeagle side of the connection) or, rather more simply, just
enable the "Obtain an IP address automatically" option.
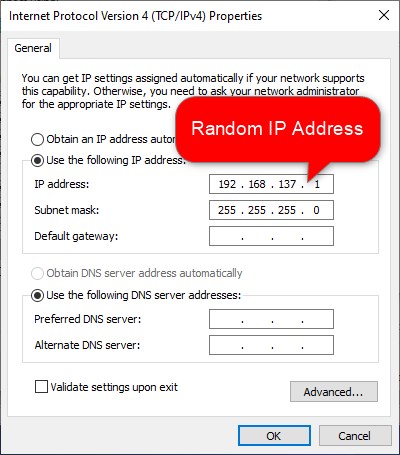
The window below shows the form with the dodgy IP address information removed and the "Obtain an IP address automatically" option enabled. Once that is done, choose OK to close the form and your connection should be configured. The Windows PC now knows how to route packets to and from the PocketBeagle.
At this point you will probably see that the PuTTY or Terminal connection to the PocketBeagle has been closed as the USB connection is reset. Just restart PuTTY or the Terminal and connect to
IP address 192.168.7.2 and login as you did previously. If you rebooted the PocketBeagle remember to re-enter the default route
command as discussed above.
You should now be able to successfully ping computers on the Internet via an IP address. However attempts to ping via a name will still fail
ping 8.8.8.8

64 bytes from 8.8.8.8: icmp_req=1 ttl=50 time=38.7 ms

64 bytes from 8.8.8.8: icmp_req=2 ttl=50 time=38.2 ms
If you power down the PocketBeagle by unplugging its USB cable, plug it back in (hence rebooting it) and connect via PuTTY and try the ping command again ...
ping 8.8.8.8

Network is unreachable
… you will find that the network is no longer reachable. This is because the
/sbin/route add default gw 192.168.7.1
command you entered earlier did not survive a reboot. Just enter it again and the ping command should work.
Devices on the Internet are rarely referred to by their IP addresses. Usually one specifies a name such as google.com which is then used to look up the IP address. We will want to ensure such name lookups are operational on the PocketBeagle. Try the command...
ping google.com
If this command does not work and the corresponding command ping 8.8.8.8 does, it means that the PocketBeagle does not know of a name server it can use to
translate the names into IP addresses. The thing that translates names into IP addresses is called a nameserver and we might as well use Googles public nameservers to
translate names into IP addresses for us. You can,
of course, use your own local nameservers if you wish. Nameservers are set in the /etc/resolv.conf file. To add a few nameservers just edit
the /etc/resolv.conf file (as root) using a command like
nano /etc/resolv.conf
On my system I edited it to look like....
domain localdomain

search localdomain

nameserver 8.8.8.8

nameserver 8.8.4.4
Once I did that, a command like
ping google.com
returned the following
PING google.com (31.55.167.150) 56(84) bytes of data.

64 bytes from 31.55.167.150: icmp_req=1 ttl=57 time=35.8 ms

64 bytes from 31.55.167.150: icmp_req=2 ttl=57 time=31.3 ms

64 bytes from 31.55.167.150: icmp_req=3 ttl=57 time=31.7 ms
Now that the Pocket Beagle is on the Internet we can take this opportunity to complete some post installation commands. As discussed above, presumably you have already changed the default passwords for the root and debian accounts. IF NOT, DO THIS NOW! - your PocketBeagle is now on the Internet.
One useful thing to do is to update the package repositories on your PocketBeagle (as root) with the command
sudo apt update
The apt update command builds a local cache of available packages and makes later installations via apt-get work much better.
At this point if you create or edit a file you will probably notice that the date and time stamp on the file is incorrect. You can adjust this manually - but since your PocketBeagle is now on the Internet you can just use a date/time server to correctly set the date and time for you. Try the following
date

Tue Dec  3 22:14:40 UTC 2019
This has returned the incorrect date. If we issue the command (as root)
/usr/sbin/ntpdate pool.ntp.org

 3 Jul 16:21:37 ntpdate[22738]: adjust time server 87.242.168.84 offset -0.002850 sec
then the date command returns....
date

Fri 03 Jul 2020 04:18:37 PM UTC
... which is the correct date.
You may get a message saying the ntpdate is not found. This is easy to fix - since you just updated the repositories in the section above, a command (as root) of
sudo apt-get install ntpdate
will install the ntpdate command for you and then you will be able to set the date correctly.
You would think that, once you set the default route and the nameservers the operating system would retain them. However, you will probably find that the default gateway, nameservers and system date were reset everytime the power cycled. It is possible to set up a script which runs each time you login (either manually or automatically) however this does require an actual login.
If you need an automatic configuration of the default route and nameservers, the way to do it is to set up a script in the /etc/init.d directory which runs a suitable configuration at an appropriate point in the boot process. This script should be set to run only when the boot process reaches runlevel 5 and also it is wise to introduce a slight delay so that the USB NDIS software can get itself properly started and running first. The procedure below is adapted from the information by Klaus Kolle on the page http://klaus.ede.hih.au.dk/index.php/BBB_Internet_over_the_USB_cable.
First create a file (as root) named internetOverUSB and place it in the /root directory. The contents of this file should be:
#!/bin/bash
#
# Set the default gateway, nameservers and date
# automatically. This script needs to be
# called via init.d

## Add a default gateway
/sbin/route add default gw 192.168.7.1

## add the nameservers if necessary
grep -q 8.8.8.8 /etc/resolv.conf
if [ "$?" -ne "0" ]; then
        echo "nameserver 8.8.4.4" >> /etc/resolv.conf
        echo "nameserver 8.8.8.8" >> /etc/resolv.conf
fi

## set the date
/usr/sbin/ntpdate pool.ntp.org

## End of the settings script
The file should have execute permissions by root so run the following command (as root)
chmod u+x internetOverUSB
Now we wish to make the above script run at startup. Create another file named internetOverUSB.sh and place it in the /etc/init.d directory. The contents should be:
#! /bin/sh

### BEGIN INIT INFO
# Provides: InternetOverUSB
# Required-Start: $all
# Required-Stop: $all
# Default-Start: 5
# Default-Stop: 0 1 6
# Short-Description: Enables Internet over USB cable
# Description: Enables access to the Internet over the Internet connection
# provided by the connected host
### END INIT INFO
case "$1" in
        start)
                sleep 20
                /root/internetOverUSB
        ;;
        stop)
                #no-op
        ;;
        *)
                #no-op
        ;;
esac

exit 0
In particular, note the sleep 20 statement above the call to /root/internetOverUSB. This delay seems to be helpful in getting
the NDIS Internet-over-USB software fully started before the default root command is added. You can adjust this as necessary.
This file also needs to be executable so run the command...
chmod 755 /etc/init.d/internetOverUSB.sh
Now we have to set the file so that it is scheduled during the startup transition to runlevel 5. We do this by making a symbolic link from /etc/rc5.d back to our startup file in /etc/init.d.
ln -s /etc/init.d/internetOverUSB.sh /etc/rc5.d/S99internetOverUSB.sh
As a bit of a digression, the S in the symbolic link name above tells the startup process to run the script it points to at startup rather than
shutdown (which would be K for Kill). The
99 simply makes it run after every other lower digit script in the /etc/rc5.d directory. The fact that the symbolic link is in the
/etc/rc5.d directory and not /etc/rc2.d (for example)
means that script will be executed on the transition to (or from) runlevel 5.
At this point you are done. You should be able to reboot the PocketBeagle and the internetOverUSB script in the /root directory will run at startup and automatically set up the default route, nameservers and set current date/time. You can reboot the PocketBeagle with a command like...
reboot now
... although just unplugging and re-plugging the USB cable is a cruder way (but also works).
I must confess that I am not a big fan of connecting the any of the Beaglebone boards to the Internet via the USB cable and usually use the ethernet solution as soon as possible - if it is available. Of course, with the PocketBeagle the ethernet option is not possible unless you go to a lot of trouble.
The Internet over USB method tends to be slow and although it is possible to get the necessary configuration changes to automatically re-configure over a reboot, such complications do not exist with the ethernet method. Also, the Windows PC sometimes forgets the connection sharing after a reboot and even though it looks right, you sometimes (in my experience), have to undo the connection sharing changes, save them, then share the connection again in order to get it to work again.
In addition, using Beaglebone board as a USB device to transfer files back and forth to the PC is not really all that satisfactory - it works but the update/refresh time is slow. For example, you might create a folder or edit a file and the changes could take 15 to 30 seconds to be visible on both devices. Not really too useful for serious work. If you wish to do that sort of thing then NFS is a far better solution in my experience.
The contents of this web page are provided "as is" without any warranty of any kind and without any claim to accuracy. Please be aware that the information provided may be out-of-date, incomplete, erroneous or simply unsuitable for your purposes. Any use you make of the information is entirely at your discretion and any consequences of that use are entirely your responsibility. All source code is provided under the terms of the MIT License.